
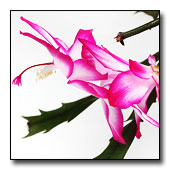
Cross-breeding Christmas Cactus: Bringing up Babies
by Wendy Tweten
Considering the ease and appeal in crossing Schlumbergeras, I'm surprised more of us don't try it.

How would you like your own forest of Christmas cactus for no more than the price of the potting soil? How would you like to look like a horticultural genius as you bestow upon your friends baskets of brightly blooming epiphytes? Well, go right ahead. Tell them you bred them yourself, but don't tell them how easy it was.
Considering the ease and appeal in crossing schlumbergeras (formerly known as zygocactus), I'm surprised more of us don't try it. The appeal, aside from the opportunity to grow genetically unique plants, is found in the "berries" which are an extremely decorative shocking pink and stay on the plant for a full year, remaining attractive to the end. The fruit is worth the effort alone, even if you never plant the seeds. Moreover, the ripening berries don't seem to inhibit the plant's next cycle of bloom in the least.
Step One: Parentage
To get started, you'll need at least two different colors (cultivars) of Christmas cactus (Schlumbergera x buckleyi) or Thanksgiving cactus (Schlumbergera x truncate) that bloom at the same time. The two species will also interbreed. When I first tried my hand at schlumbergera matchmaking, I went all out and interbred every one of my dozen assorted plants. Twelve months later began the year of 200 seedlings.
Step Two: Pollination
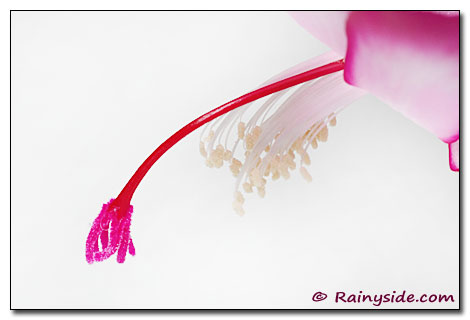
The actual pollination couldn't be simpler: rub pollen from the anthers of one flower onto the sticky tip of the stigma on a flower of another plant (A few varieties are self-fertile, but cross-pollination is a safer bet and produces more varied offspring.) The flowers tend to be fertile from the time they are fully open until they begin to fade, though reportedly they are at their most fertile on the day after opening. On some plants, the stigma opens into a "star" as the ovaries ripen: a sign the flower is receptive.
While you could employ a tiny paintbrush to move the pollen, I find it simpler to bring one potted plant to another and pollinate the flowers directly, or pull off a few ripe anthers to transport. You can even break off a flower, though, personally, I can't bear to do it.
Ovaries that have been successfully pollinated will be noticeably swollen as the flower fades. Be careful when removing the dead flower. However, the developing berries hang on tenaciously, so there's little chance of accidentally knocking one off. Unpollinated berries drop off easily.
Step Three: Harvest the Seeds
A year or more later, the fully ripened fruit will feel as soft as an overripe blueberry. Pick them at this stage, or simply wait until they fall off. Squeeze one end and squirt the contents onto a paper towel. Rub the tiny black seeds around to dry and separate. Now leave the paper towel in an undisturbed spot for a day to finish drying the seed.
Step Four: Sow the Seed
In my experience, schlumbergera seed germinates best when fresh. I've also stored it dry in a baggie in the fridge for more than a year and the germination rate seemed only slightly reduced (But really, who needs 200 seedlings?). Put seed-starting mix in a shallow tray; an old metal pie plate works well. Dampen soil. Sprinkle seed on the surface of the soil and gently water in. Cover tray with plastic wrap or seal in a clear plastic bag. Place in a bright spot (not full sun) where the temperature is a steady 70-75°F. Germination takes only a few weeks. Remove the plastic cover once the plants are up to prevent rot. Use a mister to water until the seedlings are firmly rooted, but beware, both soggy and bone-dry soils are deadly. A one-quarter-strength fertilizer such as Miracle-Gro can be used occasionally from the time the plants are half an inch tall.
Step Five: Grow Them On
Once the seedlings have their roots down and begin to crowd, prick them out and replant into a good quality potting soil. A mix for succulents is beneficial, but your regular mix should be fine as long as it's well-draining and you water only when the top of the soil is dry. Schlumbergera seedlings enjoy a little company, so put several in the same pot, spaced at least an inch apart. Separate them to individual small pots when they are two inches tall. These plants are not fond of repotting, so once they're in their own pot, don't transplant again until they've grown top-heavy, and then to an infinitesimally larger pot. Grow the young plants on in a bright spot out of direct sun, except in a northwest winter when a south window is required.
Your new little plants will take two to four years to flower. It's exciting to see what you've created; however, I must admit, after watching more than a hundred of my own seedlings come into bloom, none looked appreciably different from one of the dozen parent plants. With luck, when they do set their first flowers, it'll be just in time to hand them out to your Thanksgiving guests.
Wendy Tweten is an avid hobbyist gardener and writer living in Kingston, Washington. She is at least halfway to her goal of trying one of every kind of plant that can be grown in zone 8. Wendy studied horticulture and nursery management at South Seattle Community College. As a freelance writer, she specializes in home and gardening and Real Estate topics, and is a regular contributor to many Kitsap County and Seattle area publications. She is a member of the Garden Writers Association and her humor column is published in the Kingston Community News.
Photographed by Debbie Teashon

Gardening for the Homebrewer: Grow and Process Plants for Making Beer, Wine, Gruit, Cider, Perry, and More
By co-authors Debbie Teashon (Rainy Side Gardeners) and Wendy Tweton
Copyright Notice | Home | Search | Archives